Music, poetry, and art can be medicine for unsettling, violent times. Take a moment to seek beauty today (and every day). It will help to settle your soul in the face of what we are all experiencing right now.
Free access to 60,000 works of art in the National Gallery. They also have a wonderful Chrome extension that randomly chooses a piece of art to display anytime you open a new tab on your computer.
What a fascinating journey this morning as I travelled 1500 years back in time (via the internet) to this medieval portable altar.
On my first roll of the digital dice on this website that randomly links to other websites, I arrived at a database of portable medieval altars, created by a historian whose research interest is “portable devotion”. Lots to think about here…
“Socializing” an idea
I suspect the word has been around for a while, but I learned that “socializing” has become part of “business speak” in medical centers and hospitals, as in… “Go socialize that idea with them first.”
It turns out this new vocabulary is just a new way of describing what great leaders have known all along…you don’t know what you don’t know.
“Socializing” a new idea starts with determining who might want to “veto” your new idea and then meeting with them, not to persuade them, but to learn from them. With each meeting you learn more which lets you refine the project and, at the same time, allows your organization to evolve with you.
The best thing I learned is that the concept now referred to as “socializing” came from the Japanese concept of Nemawashi (根回し)… “Nemawashi literally translates as “turning the roots”, from ne (根, “root”) and mawasu (回す, “to turn something, to put something around something else”). Its original meaning was literal: in preparation for transplanting a tree, one would carefully dig around a tree some time before transplanting, and trim the roots to encourage the growth of smaller roots that will help the tree become established in its new location.” (Wikipedia)
There are lots of people who spend nights in the hospital to care for others… physicians, nurses, techs, and many others.
Especially for trainees who work long hours, eating well when you are on call is not easy. There are usually few (if any) options available in the hospital, and when you are exhausted it’s hard to prepare and bring your own food.
But eating well is really important …. not just nutritionally, but emotionally as well. Here’s a link to the system I’ve found works the best, but deciding that Diet Coke, graham crackers, and cereal are not major food groups is the critical first step.
p.s. I post recipes that meet the “pizza rule” (less time to cook than it takes to order a pizza) on Bluesky, Facebook, and Instagram with the hashtag #CallFood.
p.p.s Here’s the recipe for my breakfast tacos (which are also the best 2am #CallFood you will ever have).
I love good recipes and cooking in traditional ways … but I’m absolutely convinced that busy students, trainees, practicing docs, other healers (and all busy people for that matter) should own Instant Pots.
p.s. if you have the time and interest, it’s probably 5% tastier to sauté things first i.e. follow the recipe… but I know the pressure you are under (no pun intended). The 5% isn’t worth it compared to having delicious, fast, healthy food.
p.p.s. If you know a really busy person, take note – this is one of the best birthday/holiday/special occasion gifts you could possibly give them!
No medical student, resident, physician (or any other healer) has much time to cook which is why I came up with the “pizza rule” i.e. you should only cook things that take less time than it takes to order a pizza.
I discovered a cookbook today written by one of my favorite cookbook authors that starts with this sentence… “Do you have 20 minutes to make a great meal?”
It’s an entire cookbook that follows the pizza rule!!!
Cooking real food for yourself, or in a group (i.e. 3-4 friends each cook a large batch of something every week and then split it to share) is not only healthier for you, it has a lot of other advantages, too. It’s hard not to be mindful when you cook which means you can make it a practice that helps calm and center you for the rest of your busy life. Cooking also means you are taking care of yourself, and that feeling of care goes a long way to soothe days where you don’t feel much care.
If you want to hack the process of cooking for yourself to make it easier, check out this post or this one.
p.s. The book is on sale right now on Amazon for $1.99
p.p.s Even if it’s not on sale, you should buy it.
p.p.p.s If you search for #callfood on my social media feeds (@drmlb) you’ll find other recipes that are delicious, healthy, and meet the requirements of the pizza rule.
It is hard to eat well when you are a med student, resident or busy doc (also true for busy people not in medicine!). The key to eating well if you are busy is to have a strategy. You/ve developed strategies for studying to get where you are… so you have this skill set already! (Trust me, if you can learn how to take out a gallbladder or diagnose a complicated infection, you can learn to do this, too.)
As I’ve written before, here are the basic steps that you need to follow to eat well if you are “too busy to cook”:
Find recipes that sound good (but take less than 30 minutes to prepare)
Fill in a calendar with the plan for your meals (at work, on call, at home)
For the last 6 years, I have used an app that make this process incredibly easy. Paprika is not free, but it’s money well spent. I recommend downloading both the phone app (which right now is $4.99) and the app for your computer ($24.99). Try the phone app first if you aren’t sure, but I think you’ll find the laptop version is more than worth the money.
The reason I think this app is perfect for healers, healers in training, and anyone who is super busy is because it takes the four steps listed above and puts them all into one place. It not only makes it easy to choose recipes, plan your week and shop, it almost makes it fun. Here’s how:
Find recipes that sound good (but take less than 30 minutes to prepare)
Click on the browser tab to find new recipes and download the ones that work for you. As you save recipes in the app, it becomes your own personal “cookbook” which is searchable by category, name, or ingredients.
Fill in a calendar with the plan for your meals (at work, on call, at home)
This was the first moment I knew this was a great app. All you do is drag and drop the recipes you want into the appropriate day. Wow.
Make a shopping list and go shopping.
This is when I was completely sold. When you pull up the recipes you’ve chosen, there is a little “hat” icon at the top:
When you click this icon EVERYTHING IN THE RECIPE appears in a shopping list. Click what you need and repeat for the week’s recipes and voilà – your shopping list.
Because this app is on your computer and your phone, just take your phone with you to the grocery store. As you pick up each item, click the box next to it to take it off the list. If you are sharing the app with your significant other or roommates, anyone can add to the grocery list or unclick things they have bought.
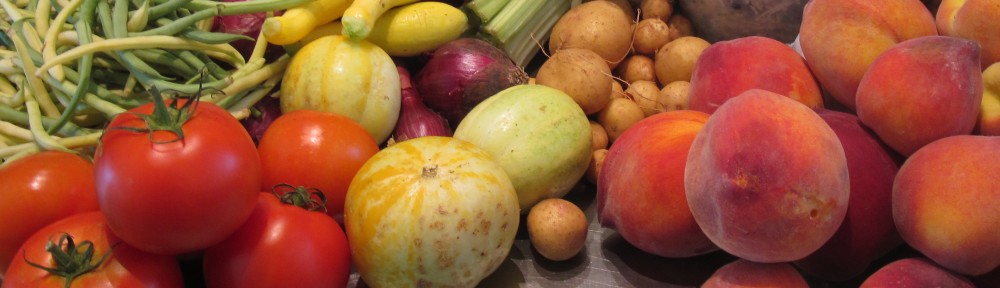
Rituals have great power, but some more than others. For me, going to the Farmers Market has become a ritual that is almost as important as the food I buy there. So I spent some time this morning pondering why…
It’s outside. Sun, clouds, breeze. Sometimes a little cool, sometimes too hot… but always the season that matches the fruits and vegetables being sold that day.
There is music. And dancing… people dancing with children, children dancing alone, folks dancing in their wheelchairs.
Everyone is happy. Seriously. Not a dour face anywhere!
There is delight in the colors, odors, and tastes.. It’s beautiful… and that sensual beauty evokes all kinds of good emotions – delight, joy, and even awe.
It anchors you to the season. We don’t have peaches in January at the farmer’s market. So when they show up in May it’s a day of celebration! Eating what is being grown in the season keeps you somehow anchored to life around you and, according to some traditions, is better for your body. It’s certainly better for the planet, since this is food grown within miles of where it’s sold… not half way across the world.
You develop relationships with the people that grow your food. Lisa’s new tortoise gets a spectacular salad every day, so we chat about his salads and her goats. I get to practice my French with the Congolese farmers who grow their produce on an inner city farm developed to provide new refugees a place to farm. Some of the vendors know my name, most of them know and recognize me with a smile (even if they don’t know my name), and all of them are happy to share how to prepare their food and what’s happening on the farm.
And then there is the food. There is no question it’s often (but not universally!) more expensive to buy your food at the farmer’s market, but for the reasons above it’s worth it. But there is one other reason … which is probably the most important reason of all.
One of the very first times I went to a farmer’s market, I bought potatoes. I remember distinctly thinking that it would not be worth the extra money because “it’s just a potato”… but I did it anyway. Every potato I had ever bought in a store tasted the same as every other potato … so I didn’t expect these to be any different. Wow… I was SO wrong. A potato that has been pulled out of the ground the day before you cook it is absolutely amazing. A light went on. Fresh food raised in smaller quantities by people who are devoted to doing it tastes better. It just does.
There is most likely a farmer’s market near you if you live in a city, but if there isn’t you have a other options (The USDA Local Foods Directory is a wonderful way to find farmers markets, gardens, and local farms near you if you need help. )
CSAs (Community Supported Agriculture). Google “CSA’s near me” to find farms that make up boxes with small portions of anything they are harvesting that week to distribute to people who have signed up with them.
Community Gardens. If you love to garden (and you can spare a few hours every once in a while) you might want to actively participate – it’s also pretty soul soothing to dig in the dirt and grow your own tomatoes. But it’s also worth asking if you can buy any produce that isn’t otherwise promised.
A local farmer or neighbor who has a big garden. You don’t know unless you ask. Offering to buy some of their produce might end up being a win-win. They may have too much produce, need a little extra income, or both. And you end up with fresh produce and a relationship with the person who grows it!
I just waved goodbye to a dear friend as she started the drive to her new residency – with a jar of “Tamar”, my sourdough starter* in her cooler. I was going to print some instructions to send with the starter, but decided it might be better to put those instructions here for her – and for all of you who have thought about making sourdough bread (but think you are too busy).
Why bother?
This is a legitimate question. What I’ve learned from making my own bread during the pandemic is that it’s more than just having delicious, warm bread to sustain you. I won’t wax too poetic, but there are three reasons I think you should ponder baking your own bread:
A sourdough starter is a living thing who is there to help feed you
Making the bread is an act of self-care, a gift to yourself
This is a profoundly slow and deliberate act. Mindfulness doesn’t get any better than this.
So, if you are intrigued, I’ve thought about this for a while and here is how I think this could work for residents – even during a crazy 80 hour week.
There’s a decent chance that someone where you work bakes sourdough bread. If they do, they will be delighted to give you some starter. It’s not a bad way to make some new friends and/or expand your circle of friends.
If you don’t find someone with starter, make your own. Sourdough starter comes from the bacteria and yeast that are in our environment so it’s a matter of mixing flour, water and time. If you want to help out some scientists while you make your starter, check out the NC State Sourdough Project.
Step 2: Understand the big picture
Sourdough starter is a living thing. You need to feed it once a week by adding some water and flour. Period. If you want to stop here and just have the starter around “in case” you decide to bake, this is all you have to do.
You are going to love the science of this. I’ll even predict you’ll end up using a scale to make sure your grams of ingredients are exact… but remember, as much as this will feel like science, its also how our ancestors made bread thousands of years ago. Don’t lose that perspective.. or that connection… when you bake.
It’s a four-step process with variations depending on the recipe:
Mix the 4 ingredients (starter, flour, salt and water) to make dough
Rise – long and slow. Overnight in the fridge, 2-6 hours on the counter. It varies by the recipe.
2nd rise – usually. for 1-3 hours and in a container to shape the dough
Bake
Step 3: Find an easy recipe to start with so you don’t get overwhelmed…
Mix the dough (1 cup starter, 1.75 cups lukewarm water, 5 cups of flour, 1 tablespoon of salt)
Let it rise for about an hour then stretch it out and fold it onto itself several times. The recipe says repeat this once an hour for a total of three times, but you can skip the 2nd and/or 3rd times if you need to.
Put it in the refrigerator overnight.
Flip it over, seam side up into a bowl or loaf pan (to shape it) and let it sit for 2.5-3 hours.
Flip it back over (seam side down) into your pan, slash the top to provide a controlled way to expand and bake.
Step 4: Map out a schedule
Let’s say it’s Thursday evening and you are off on Friday. Here’s how this recipe might work for you…
Thursday when you get home, mix the dough. If you don’t have time to let it rise on the counter for an hour and stretch it, just put it in the refrigerator. (Trust me, it will work). Take the starter that didn’t go into the recipe, feed it, and put it back in the refrigerator.
Friday when you wake up put the dough in a bowl or loaf pan and let it sit for 2-3 hours on the counter. This will mold it into whatever shape you want.
Heat up your cooking container (dutch oven, oven proof pot, tray) as you preheat the oven.
Put parchment paper on top of the bowel and flip the dough out of the bowl onto the parchment paper.
Use the parchment paper to lower the dough into your hot cooking container.
Score the top and bake!
(Don’t forget to let it sit for an “hour” before you slice it… no matter how good it smells)
When you overproof dough (too long with too vigorous a starter) is gets REALLY liquid and REALLY sour. It isn’t worth trying to salvage it.
It’s an art. Everyone has bread that bombs.
Don’t worry! Just keep the starter alive, regroup and try again!
If you find you are having issues with getting a good rise, it’s ok to put some dry yeast in as “insurance”. Poilâne’s famous sourdough includes it as part of the recipe, so it can’t be a “failure” in the sourdough world!
Comparing stater activation between white flour (dotted line) and whole wheat (solid line)
What to study next
If you are reading this, there’s a good chance you are Type A. You’ll probably get a notebook and treat this like a science experiment … like I did. Go for it! It turns out that even though sourdough bread has only 4 ingredients (starter, flour, water, salt) there are lots of variables that can affect the loaf e.g. temperature of the water, humidity in the room, etc. There is real joy in paying this much attention while creating something that is so sustaining. On the other hand, if this doesn’t make you happy, just make the bread!
Did I mention?… it’s not just bread…foccacia, pizza dough, pancakes… just wait until you find all the cool things you can do with sourdough starter and discard!
This may be one of the easiest kitchen tricks I’ve learned in the last few years. I haven’t bought any stock since I figured this out. It saves money, but more importantly, this stock tastes MUCH better than anything you can buy.
Step 1: As you peel, chop, and otherwise use any vegetables for recipes or salads, save all the pieces you would normally throw away.
The vegetables that help the most with umami (and make your stock great) are the classic mirepox (carrots, celery and onion), garlic bits, and mushrooms. There are a few vegetables you should avoid using for stock. Some vegetables will make the stock bitter or impart a strong, very specific taste that may not work in some recipes (e.g eggplant, turnips, cilantro, ginger). If you happen to be someone who buys Parmesan cheese with a rind, those rinds are wonderful in stocks. If you use fresh herbs when you cook, make sure you throw the stems in the stock.
Step 2: Keep a big ziplock bag in the freezer and toss the washed bits you saved into the bag. When you drain beans, tomatoes or other vegetables from cans, put the juice in the bag, too.
Step 4: Freeze the stock you don’t use in a day or two.
I usually freeze my stock in 1-2 cup plastic containers. Alternatively, use freezer bags if you want to take up less space in your freezer (Push the air out of the bags and lay them flat on a cookie sheet to freeze). Another trick is to freeze the stock in ice cube trays or muffin tins and then put the frozen stock in freezer bags.
In addition to recipes, use this stock instead of water when you make rice or grains. Thaw your stock in the refrigerator (if you remember) or in the microwave (if you don’t).
We eat a mainly plant based diet, so I only make vegetable stock. If you eat meat, you can save the bits from the meat or fish you cook – or ask your butcher for stock worthy bones and add them to the vegetables to make great chicken, beef or seafood stock. If you want perfect chicken or beef stock, you may have a bit more work to do… 🙂
It is hard to eat well when you are a medstudent, resident or busy doc (also true for busy people not in medicine The key to eating well if you are busy is planning.. but it takes time. As I’ve written before, here are the basic steps that you need to follow to eat well if you are “too busy to cook”.
Use a calendar to organize which days you need to have dinner ready
Find the recipes you want to cook
Fill in the calendar with what you will take to work for lunch and your planned dinners.
Make a shopping list.
Shop once, then follow your plan
To follow these steps, I’ve used the internet to find recipes, Evernote to map out the week, and Grocery IQ for the shopping list. I’ve gotten pretty efficient, but it’s still takes a non-trivial amount of time… and who has that kind of time, right?
Here’s the bottom line… this app is “expensive” ($25). But I promise, even if you are medical student without much money, it will be the best $25 you’ll spend this year.
Here’s why – this app takes the five steps listed above and puts them all into one place. It not only makes it easy to choose recipes, plan your week and shop, it almost makes it fun. Here’s how:
Use a calendar to organize which days you need to have dinner ready.
Start on the “meals” tab and put notes in for your week. If you share cooking with a significant other or roommates, you can share the account with them so everyone is (literally) on the same page.
Find the recipes you want to cook and put them in the calendar for the week
Click on the browser tab to find new recipes. As you gather recipes in the app, it becomes your own personal “cookbook” which is searchable by category, name, or ingredients.
Fill in your calendar with what you will take to work for lunch and your planned dinners.
This was the first moment I knew I was really hooked. All you do is drag and drop the recipes you want into the appropriate day. Wow.
Make a shopping list and go shopping.
This is when I was completely sold. When you pull up the recipes you’ve chosen, there is a little “hat” icon at the top:
When you click this icon EVERYTHING IN THE RECIPE appears in a shopping list. Unclick what you don’t need and repeat for all the recipes.
Because this app is on your computer and your phone, just take your phone with you to the grocery store. As you pick up the item, click the box next to it and move on to the next item. If you are sharing the app with your significant other or roommates, anyone can add to the grocery list or unclick things they have bought.
Here’s the official website for Paprika: https://www.paprikaapp.com/. Enjoy your healthy eating!!!! Try this plan (instead of the bagels, pizza, peanut butter and other “free” foods in the hospital) for a week or two. I promise you’ll feel better, learn better and have more energy to take good care of your patients.
Seriously, anything that frees up time for them is the best present you can give them. If it supports their health or decreases stress, it’s even better!
Here are my top ten choices for best presents for medical students and residents – or any really busy person:
A service or person to help clean their home. Once a month? Once a week? Any time they don’t have to vacuum or clean the bathrooms is a true gift.
An Instapot. I’ve long been a fan of pressure cookers, but the Instapot takes it to the next level. This is my new favorite kitchen tool and it’s high on my list because it both saves time and increases healthy food consumption!
A subscription to Headspace. This might seem counter-intuitive since it adds a 10 minute task to their day… but there are data (and lots of testimony) that a daily mediation practice “expands time” by decreasing stress.
If they live close enough to walk or bike to school/work, think about something that might help them combine that commute with getting some exercise. How old is their bicycle? How about panniers to store gear on a bike? Would a great backpack help if they are likely to walk? How about a gift certificate to a bicycle shop?
If they are a coffee drinker who spends time stopping at Starbucks, think about a really good coffee maker. I prefer Nespresso because the pods are recyclable (and the coffee is delicious).
Your time. Can you cook some meals once a month and put them in their freezer?. Do laundry? Bake cookies and mail them? Get their car washed? Make an elaborate certificate with something you could do for them and wrap it as a present.


